I've always been a heavy IDE user - but for some things, like running tests, I still prefered a terminal. Recently I've played around with the in-IDE possibilities for testing and was pretty satisfied with them. Since Symfony ships with a kinda custom testing experience here's how to setup your IDE to test your Symfony applications with it - and additional features of testing within your IDE.
IDE configuration
After following the current Testing documentation it's mandatory to manually run ./bin/phpunit once in your terminal. Symfony will install its own instance of PHPUnit within your bin directory which will provide the executable phpunit file for our IDE.
After you've run this command you'll see a .phpunit directory within your bin directory.
For being able to run your tests via your IDE open your Settings window and navigate to Languages & Frameworks > PHP > Test Frameworks.

Click on the + icon on the right side and select PHPUnit Local. Specify the Path to phpunit.phar and select the phpunit file within your .phpunit directory. Additionally set your Default configuration file to your phpunit.xml in your Symfony directory.
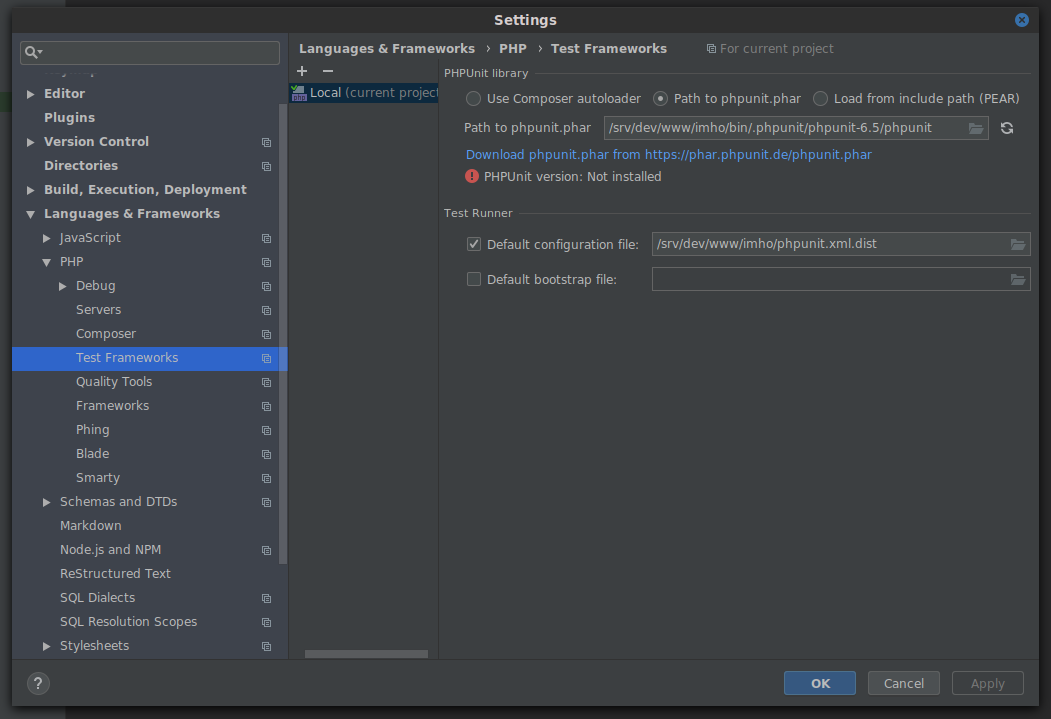
Note: Keep in mind to change your configuration file to phpunit.xml instead of phpunit.xml.dist in case you're using a customized configuration file.
Open one of your tests and click on the Run test icon and select Run '<your test name>'. A window will pop up where you can edit your configuration (we'll come to this topic in a second); and, if you haven't set an interpreter for your project, you'll see a exclamation mark with a pretty weird message:

Clicking on the Fix button will open a window where you can set your CLI interpreter. If there's no interpreter in your dropdown click on the icon next to the dropdown and add your PHP interpreter path. This should look somewhat like this:

Note: It's recommended to have a debugger like xdebug installed. In case you're using Ubuntu simply install it with sudo apt install php-xdebug.
Now select your interpreter path and the exclamation mark should disappear - meaning you're now ready to run your tests.
Clicking on Run should now open an additional view within your IDE showing the result of your test.

Usage
Being able to run tests within your IDE is one thing - understanding and taking advantage of it is something different. Let's take a deeper look at our possibilities:
Configurations
You could add configurations for every single test, for an entire test class or whatever you want. For example you could create a configuration which executes all your unit tests but not your functional tests - click on the Edit configurations item within your configurations dropdown at top of your IDE and create a new configuration for your unit tests which points to your unit tests directory.

Now selecting the Unit tests configuration will run all your unit tests - and nothing else.
Code coverage
Important: Keep in mind that this requires the xdebug extension!
If you strive for higher code coverage PhpStorm offers great tools to make your life easier. Assume the following code:
public function equals13($input)
{
    if (! is_numeric($input)) {
        throw new \InvalidArgumentException("Argument must a number");
    }
    return $input === 13;
}
A test for this would be pretty simple:
public function testEquals13()
{
    $helper = new NumberHelper();
    $this->assertTrue($helper->equals13(13));
    $this->assertFalse($helper->equals13(42));
}
A great test for a great method, nevertheless we're missing something: we've missed to test the path for non-numeric values.
If you run your tests with the Run '<your test> with Coverage PhpStorm will generate a visual representation of your tests. In case of your equals13 method it will look like this:

This makes it very easy for you to detect untested code. Additionally PhpStorm will now show a coverage report and show code coverage within your project structure.
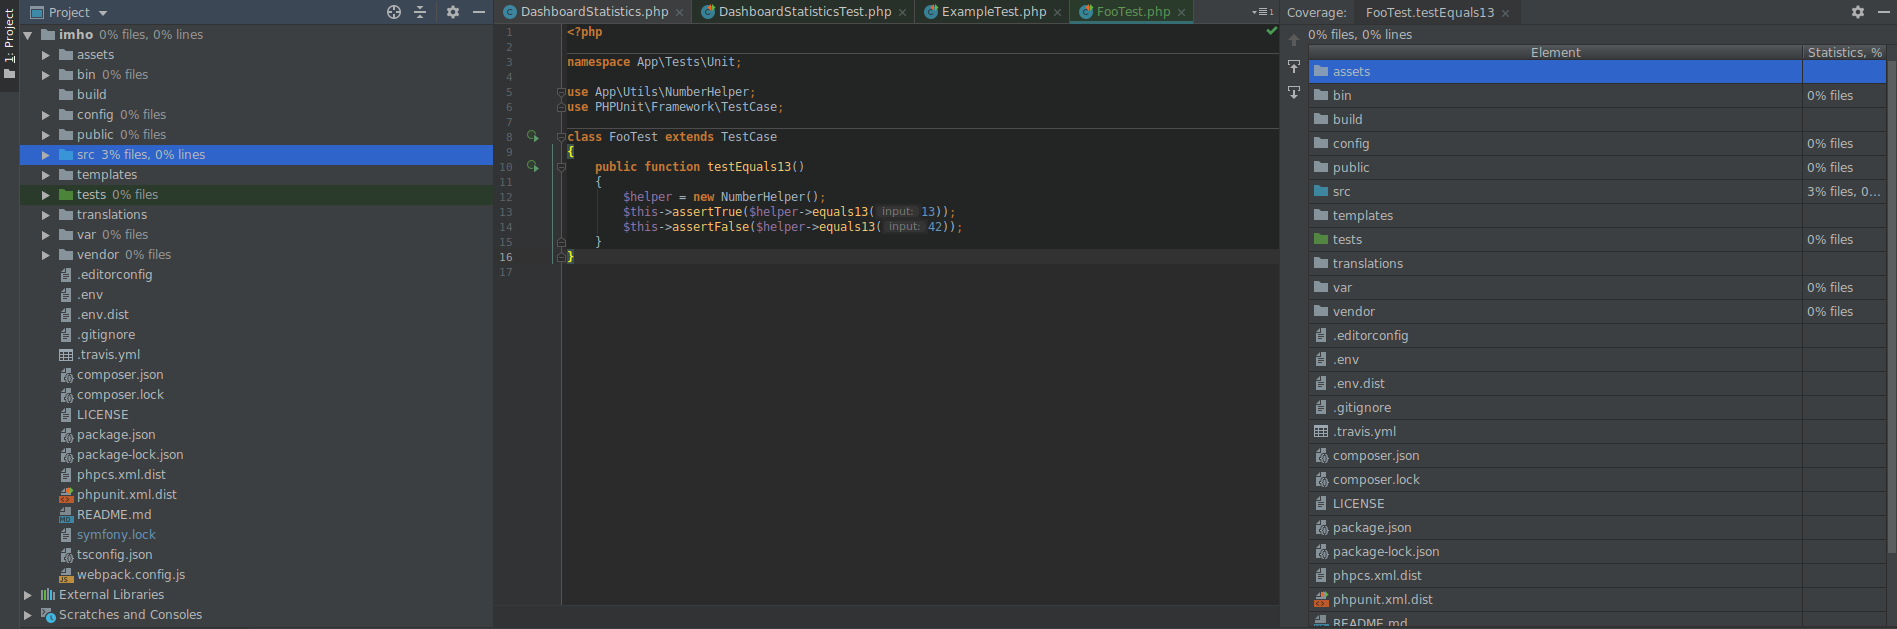
In case you're ashamed of your low coverage and want to hide these stats again simply click on Tools > Hide coverage to make them disappear.
Auto testing
Another useful feature is auto testing, which essentially just executes your tests after your code is changed (without you having to do anything). To enable this feature simply click on the Toggle auto test button in your Run window. To adjust the delay between code changes and tests being executed you might change the value of the AutoTest Delay (click on the cogwheel icon within your Run window).
Why no terminal?
Since I've acknowledged the importance of tests and started writing them I've executed them in a terminal. Throughout the time I figured out that the only arguments I'm sometimes changing are generating a coverage export (with --coverage-clover) and to just execute a single test instead of all of them (with --filter). A big drawback of that was that I always had to re-load my coverage file in case I wanted to see updated code coverage within my IDE which was really annoying.
Both of these options are fully covered within my IDE - and I could do even more without having to store a shitload of terminal commands. Clicking on a "Play" icon may doesn't make you look like a hackerman like typing complex terminal commands would do - but it's easier and faster.
If there are any features regarding testing you'd think should be added to this post (or any drawbacks in your opinion using an IDE for testing instead of a terminal) please let me know in the comments.