Implementing Selenium tests in JavaScript can get confusing, especially since many resources are either for different languages or out of date. Even harder to find are guides on how to run these tests against BrowserStack (or similar services). For our last project we had to implement such tests; and, if you know how to do it, it's actually pretty simple.
What we're going to do
This guide will cover multiple parts of implementing Selenium tests:
- How to implement basic Selenium tests using the
async/awaitapproach - How to combine Selenium tests with Mocha and Chai
- Testing against BrowerStack
- The value of Selenium tests
- Useful tips
Implementing basic tests
There are many ways how to implement Selenium tests, but the easiest is probably the "async/await" approach. The Selenium webdriver mostly returns Promises, which is really easy to handle by using this approach.
But let's start at the beginning by creating a package.json which includes the dependencies we're going to need for creating basic tests.
{
  "name": "selenium-mocha-chai-testing",
  "scripts": {
    "test": "node Tests/DefaultTest.js"
  },
  "private": true,
  "devDependencies": {
    "chromedriver": "^2.41.0",
    "selenium-webdriver": "^4.0.0-alpha.1"
  }
}
As you can see the only dependencies - for now - are chromedriver and selenium-webdriver.
Keep in mind that the driver needs to fit with your installed browser version. In case of our driver version,
^2.41.0, your Chrome must be version>= 67.0.3396.0. If you do have an older Chrome consider using an older driver.
We're going to test against Chrome in this guide; in case you want to test against Firefox you're going to need the Geckodriver.
So let's implement our test; we're going to implement a test which searches for my blog on Google, clicks the link and checks if the page title of my blog is correct.
// Tests/DefaultTest.js

const {Builder, By, until} = require('selenium-webdriver');

(async function example() {
    const driver = await new Builder().forBrowser('chrome').build();

    try {
        await driver.get('https://www.google.com');
        await driver.findElement(By.name('q')).sendKeys('nehalist');
        await driver.findElement(By.id('tsf')).submit();
        await driver.wait(until.elementLocated(By.id('search')));
        await driver.findElement(By.linkText('nehalist.io')).click();
        await driver.wait(until.titleIs('nehalist.io'));
    } finally {
        await driver.quit();
    }
})();
As you can see every single line within the try block is a command which is executed by our driver. Since the driver API is asynchronous we're using the await keyword to wait until every single command is done before going to the next one (which also forces us to put everyhing within an async function).
In case you want to know more about
async/awaitthere's a great article on javascript.info about it.
It's important to call driver.quit() at the end of your tests so your driver knows when everything is done and to exit your Chrome instance.
Now comes the cool part: running npm run test now will start a Chrome instance and execute our commands:

That's basically how to easily implement Selenium tests. But, strictly, this is not a real test. It just executes commands and exits properly (= without errors) when it's done. A real test would assert specified expectations and behave properly on success or failure - and that's where Mocha and Chai join the party.
Combing our Tests with Mocha and Chai
Before looking at how to combine our Selenium test with Mocha and Chai let's briefly cover:
What is Mocha and Chai?
Mocha is a test framework responsible for defining and running test suites, while Chai is an assertion library helping you to implement these suites. Looking at the examples of their website Mocha makes things like this possible:
var assert = require('assert');
describe('Array', function() {
  describe('#indexOf()', function() {
    it('should return -1 when the value is not present', function() {
      assert.equal([1,2,3].indexOf(4), -1);
    });
  });
});
Chai, looking at the expect style, makes it possible to define our assertions in a natural language, e.g.:
expect(42).to.equal(42);
expect("foo").to.be.a('string');
expect([1, 2, 3]).to.have.lengthOf(3);
Chai offers three different styles:
should,expectandassert. Since I'm used toexpectwe're going to use this one for this guide, but feel free to switch to the style you like.
Running Selenium tests with Mocha and Chai
We now need additional dependencies in our package.json for Mocha and Chai, making the entire devDependencies section look like this:
  "devDependencies": {
    "chai": "^4.1.2",
    "chromedriver": "^2.41.0",
    "mocha": "^5.2.0",
    "selenium-webdriver": "^4.0.0-alpha.1"
  }
Additionally our test script now needs to run mocha, making it look like:
  "scripts": {
    "test": "node_modules/.bin/mocha Tests/DefaultTest.js --timeout 10000"
  },
The default timeout for a test suite in Mocha is 2 seconds, which is most likely not enough for Selenium tests (especially when navigating through the web which depends on many factors like network connectivity, etc. and maybe even things you can't even influence like "is Google even working?").
We're now ready to implement our Mocha test suite for our Selenium test:
const { Builder, By, Key, until } = require('selenium-webdriver');
const { expect } = require('chai');

describe('DefaultTest', () => {
    const driver = new Builder().forBrowser('chrome').build();

    it('should go to nehalist.io and check the title', async () => {
        await driver.get('https://www.google.com');
        await driver.sleep(20000);
        await driver.findElement(By.name('q')).sendKeys('nehalist', Key.ENTER);
        await driver.wait(until.elementLocated(By.id('search')));
        await driver.findElement(By.linkText('nehalist.io')).click();
        const title = await driver.getTitle();

        expect(title).to.equal('nehalist.io');
    });

    after(async () => driver.quit());
});
It looks kinda similar to our test from above, but it's now wrapped in its own suite and running npm run test now provides way more useful information:
From here you can test whatever you want, for example check if the given social links are correct:
    it('should go to nehalist.io and check social icon links', async () => {
        await driver.get('https://nehalist.io');
        const twitterLink = await driver.findElement(By.className('social-link-twitter')).getAttribute('href');
        const githubLink  = await driver.findElement(By.className('social-link-github')).getAttribute('href');

        expect(twitterLink).to.equal('https://twitter.com/nehalist');
        expect(githubLink).to.equal('https://github.com/nehalist');
    });
Testing against BrowserStack
Only testing against your local Chrome version might seem odd (well, kinda, but we'll come to that later). What about Firefox? What about the all beloved IE? What about mobile phones?
Well, it's obviously pretty hard to have all browsers in existence installed on your system. That's where services like BrowserStack, which provide numerous machines to test against, comes in handy.
Running automated Browser tests on BrowserStack is not free. See available plans here.
Generally speaking, testing against BrowserStack is really simple. Adjust your driver to use the BrowserStack server and you're good to go:
const driver = new Driver()
  .usingServer('http://hub-cloud.browserstack.com/wd/hub')
  .withCapabilities({
    'browserstack.user': '<your browserstack username>',
    'browserstack.key': '<your browserstack key>',
    'browserName': 'Chrome',
    'browser_version': '68.0',
    'os': 'Windows',
    'os_version': '10',
    'resolution': '1920x1080'
  })
  .build();
Replace <your browserstack username> and <your browserstack key> with your access data (found here) and your tests are executed against a Chrome instance under Windows 10 on BrowserStack.
But we're still testing against a single browser here. If we want to test against multiple browsers we need to adjust our driver every time we run our test - but we developers are kinda lazy and don't want to do that. Actually we just want to have a configuration file where we specify which browsers to test against, run our tests, wait some time (to get some coffee), come back and see if we've messed up hard. So let's implement a script which is able to do exactly this.
The runner script
We're implementing a script called runner.js which is responsible for running all our tests against all desired browsers. The first thing we need is a configuration file for our runner:
// config.json

{
  "tests": [
    {
      "file": "./Tests/DefaultTest.js",
      "timeout": 30000
    }
  ],
  "browsers": [
    {
      "browserName": "Chrome",
      "browser_version": "68.0",
      "os": "Windows",
      "os_version": "10",
      "resolution": "1920x1080"
    },
    {
      "browserName": "Firefox",
      "browser_version": "61.0",
      "os": "OS X",
      "os_version": "11.0",
      "resolution": "1920x1080"
    },
    {
      "browserName": "IE",
      "browser_version": "8.0",
      "os": "Windows",
      "os_version": "7",
      "resolution": "1920x1080"
    }
  ]
}
Since our runner should be able to execute many tests against many browsers we need to define what tests to execute against what browsers. In the case of the given configuration file this means that the DefaultTest will be executed against Chrome on Windows, Firefox on OS X and, because everyone loves it, IE 8 on Windows 7.
The runner itself is actually a pretty simple script, iterating through all browsers and tests and run the tests. Nevertheless, there are some tricky things about this implementation - so let's take a look at the final script and dissect it afterwards:
const { Builder } = require('selenium-webdriver');
const config = require('./config.json');
const Mocha = require('mocha');

const currentDate = Date.now().toString();

// ES5 native `Array.prototype.forEach` is not async; since tests are executed asynchronously we're going to need an
// async version of `forEach`
let asyncForEach = async (arr, cb) => {
    for (let i = 0; i < arr.length; i++) {
        await cb(arr[i], i, arr);
    }
};

(async () => {
    // Iterate over all browsers.
    await asyncForEach(config.browsers, async browser => {
        // Assign our BrowserStack access data to our browser.
        const bsConfig = Object.assign({
            'browserstack.user': '<your browserstack name>',
            'browserstack.key': '<your browserstack key>'
        }, browser);

        // Iterate over all tests.
        await asyncForEach(config.tests, async testCase => {
            // Set the global `driver` variable which will be used within tests.
            global.driver = await new Builder()
                .usingServer('http://hub-cloud.browserstack.com/wd/hub')
                .withCapabilities(Object.assign({
                    name: testCase.file,
                    build: currentDate,
                    project: 'Nehalist:SeleniumGuide'
                }, bsConfig))
                .build();

            // Create our Mocha instance
            const mocha = new Mocha({
                timeout: testCase.timeout
            });

            // Since tests are executed asynchronously we're going to return a Promise here.
            return new Promise((resolve, reject) => {
                // By default `require` caches files, making it impossible to require the same file multiple times.
                // Since we want to execute the same tests against many browsers we need to prevent this behaviour by
                // clearing the require cache.
                mocha.suite.on('require', function (global, file) {
                    delete require.cache[file];
                });

                // Just so we can see what tests are executed in the console.
                console.log(! browser.device
                    ? `Running ${testCase.file} against ${browser.browserName} (${browser.browser_version}) on ${browser.os} (${browser.os_version})`
                    : `Running ${testCase.file} on ${browser.device}`
                );

                mocha.addFile(`${testCase.file}`);

                mocha.run()
                    // Callback whenever a test fails.
                    .on('fail', test => reject(new Error(`Selenium test (${test.title}) failed.`)))
                    // When the test is over the Promise can be resolved.
                    .on('end', () => resolve());
            });
        });
    });
})();
Asynchronously iterating over browsers and tests
The first you're probably noticing is that we're not using the ES5 native Array.prototype.forEach, but instead an own implementation of forEach called asyncForEach. That's because tests are executed asynchronously, meaning we want to wait for each test to finish before we start the next one.
Credits to Sebastien Chopin
In case you want your tests to be executed in paralell you're going to implement a queue (since paralell tests on BrowserStack are limited). In this case it might be a good idea to take a look at the async library.
The global driver object
Another thing is that we set a global object for our driver.
I'm pretty sure a lot of people have already fallen from their chair, wrestling for air while shouting "BUT GLOBALS ARE BAD!!". Yeah, most of the time that's true, but we're in a test environment, so no one cares.
The easiest way to pass our driver to our tests is to set a global object. Going back to our DefaultTest.js we're replacing our driver
const driver = await new Builder().forBrowser('chrome').build();
with
const driver = global.driver;
Tip: In case you still want to test against a local driver you could simply use:
const driver = global.driver
        ? global.driver
        : new Builder().forBrowser('chrome').build();
name, build and project within capabilities
BrowserStack offers a neat feature to group tests. Since all tests are executed within the same build they are grouped on BrowserStack, which provides you a detailed view like this:
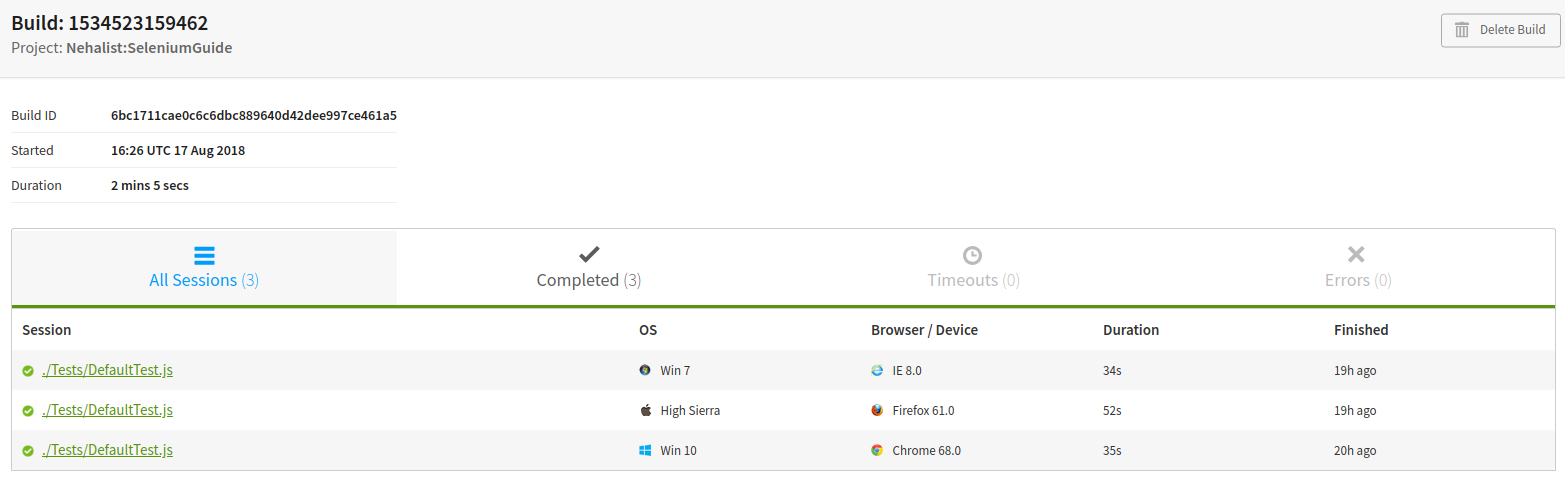
In case you're running many tests this makes it easier to find them and to see what happened without having to look at each test.
Done!
Your Selenium tests can now be easily run against BrowserStack. Wohoo!
To make it easier to start our runner script we could extend our package.json scripts:
  "scripts": {
    "test": "node_modules/.bin/mocha Tests/DefaultTest.js --timeout 10000",
    "runner": "node runner.js"
  },
Now you can either run npm run test to test against your local driver or npm run runner to test against BrowserStack.
If everything works fine your console output should look like this:

Pretty long gif.
As always, the entire source code for this guide is on GitHub.
Let's talk about the value of Selenium Tests
Selenium tests can be very useful, especially when you want to automate testing against many browsers and maintain your own sanity by not doing this manually.
They are even very handy when automating a testing routine. In the beginning I mentioned our Shopware plugin which has Selenium tests for every single payment method (e.g. PayPal, Credit Card, ...). Selenium tests were incredibly useful in this case, since everytime we wanted to buy a product in our shop to test new functionality we simply ran the desired Selenium test and could easily tell if a customer would still be able to pay with this payment method. This worked out pretty good - most of the time.
In fact, there are some major disadvantages in Selenium tests.
In case of testing against third party interfaces the meaningfulness of Selenium tests is drastically decreased
If you've implemented your own piece of software which is not depending on any third party APIs the meaningfulness of Selenium tests is probably a lot higher than if you test against APIs. For example, the PayPal Selenium test for our Shopware plugin covers the entire payment process - including the PayPal login, the PayPal confirmation, etc..
This is not something we can influence - if PayPal is down our tests will fail. If PayPal changes the ID of their login button the test will fail. If PayPal changes the name of their loading spinner overlay - the test will fail. Even if their server takes too long to respond the test will fail.
In short: if PayPal fucks up, our tests are becoming kinda useless. We'd get an email stating that our test failed, we have to check what happened and ultimately go for "Well, PayPal fucked up, there's nothing we could do about. Start the build again and hope for the best".
Since our plugin provided more than 10 payment methods which rely on APIs we have no influence on we ultimately decided not to include Selenium tests to our CI (which is Travis). Our builds failed very often due to things which were not in our responsibility, making the test results kinda useless. In the end we mostly used them locally to check if payment methods were still working after changes and decided that these tests should be part of quality assurance and not the CI build.
Maintenance is an extremely time-consuming act
Having working Selenium tests means you can't simply change the ID or the name of an element without thinking about breaking your test. It's getting even more difficult if you rely on third party applications - if they change something you have to adjust your tests, meaning you need to find out new IDs, new names, maybe even an additional new page you need to cover; hence adjusting Selenium tests can quickly become very time-consuming.
I've heard rumors that there are people out there who actually likes to implement and adjust Selenium tests. Honestly I believe these people haven't implemented a lot of Selenium tests so far in their life...
Useful tips
Always keep in mind: mostly everything is async!
Always keep in mind that most functions provided by the selenium webdriver (in our case the driver object) are asynchronous. If you forget about that it might cost you a lot of time to find problems.
Integrating our Selenium tests in Travis CI
Don't do that. See Let's talk about Selenium tests
There's a pretty good guide on Travis on how integrate your Selenium tests on their systems - or on how to run these tests against BrowserStack.
It might be a good idea to change the build in our runner script to the build job of Travis:
build: process.env.TRAVIS ? `${process.env.TRAVIS_JOB_NUMBER}` : 'local'
See here for a list of available environment variables provided by Travis.
But again: don't do that.
Running tests against the local machine on BrowserStack
BrowserStack provides a tool to run tests on your local machine. The only thing you need to change in your runner is the way your driver is built;
const bsConfig = Object.assign({
            'browserstack.user': "<your browserstack name>",
            'browserstack.key': "<your browserstack key>",
            'browserstack.local': 'true',
            //'browserstack.localIdentifier': '<local identifier>'
        }, browser);
localIdentifier is optional and used when using the same BrowserStack account for multiple applications - see here for further information.